
Customer records remain in Google Sheets and Drive.
SheetsCRM documentation
Setup and user guide.
Follow the complete process from installing SheetsCRM to building your database and inviting your team.
One setup for the account ownerThe owner completes the wizard. Invited users install the app and sign in.
01
Getting started
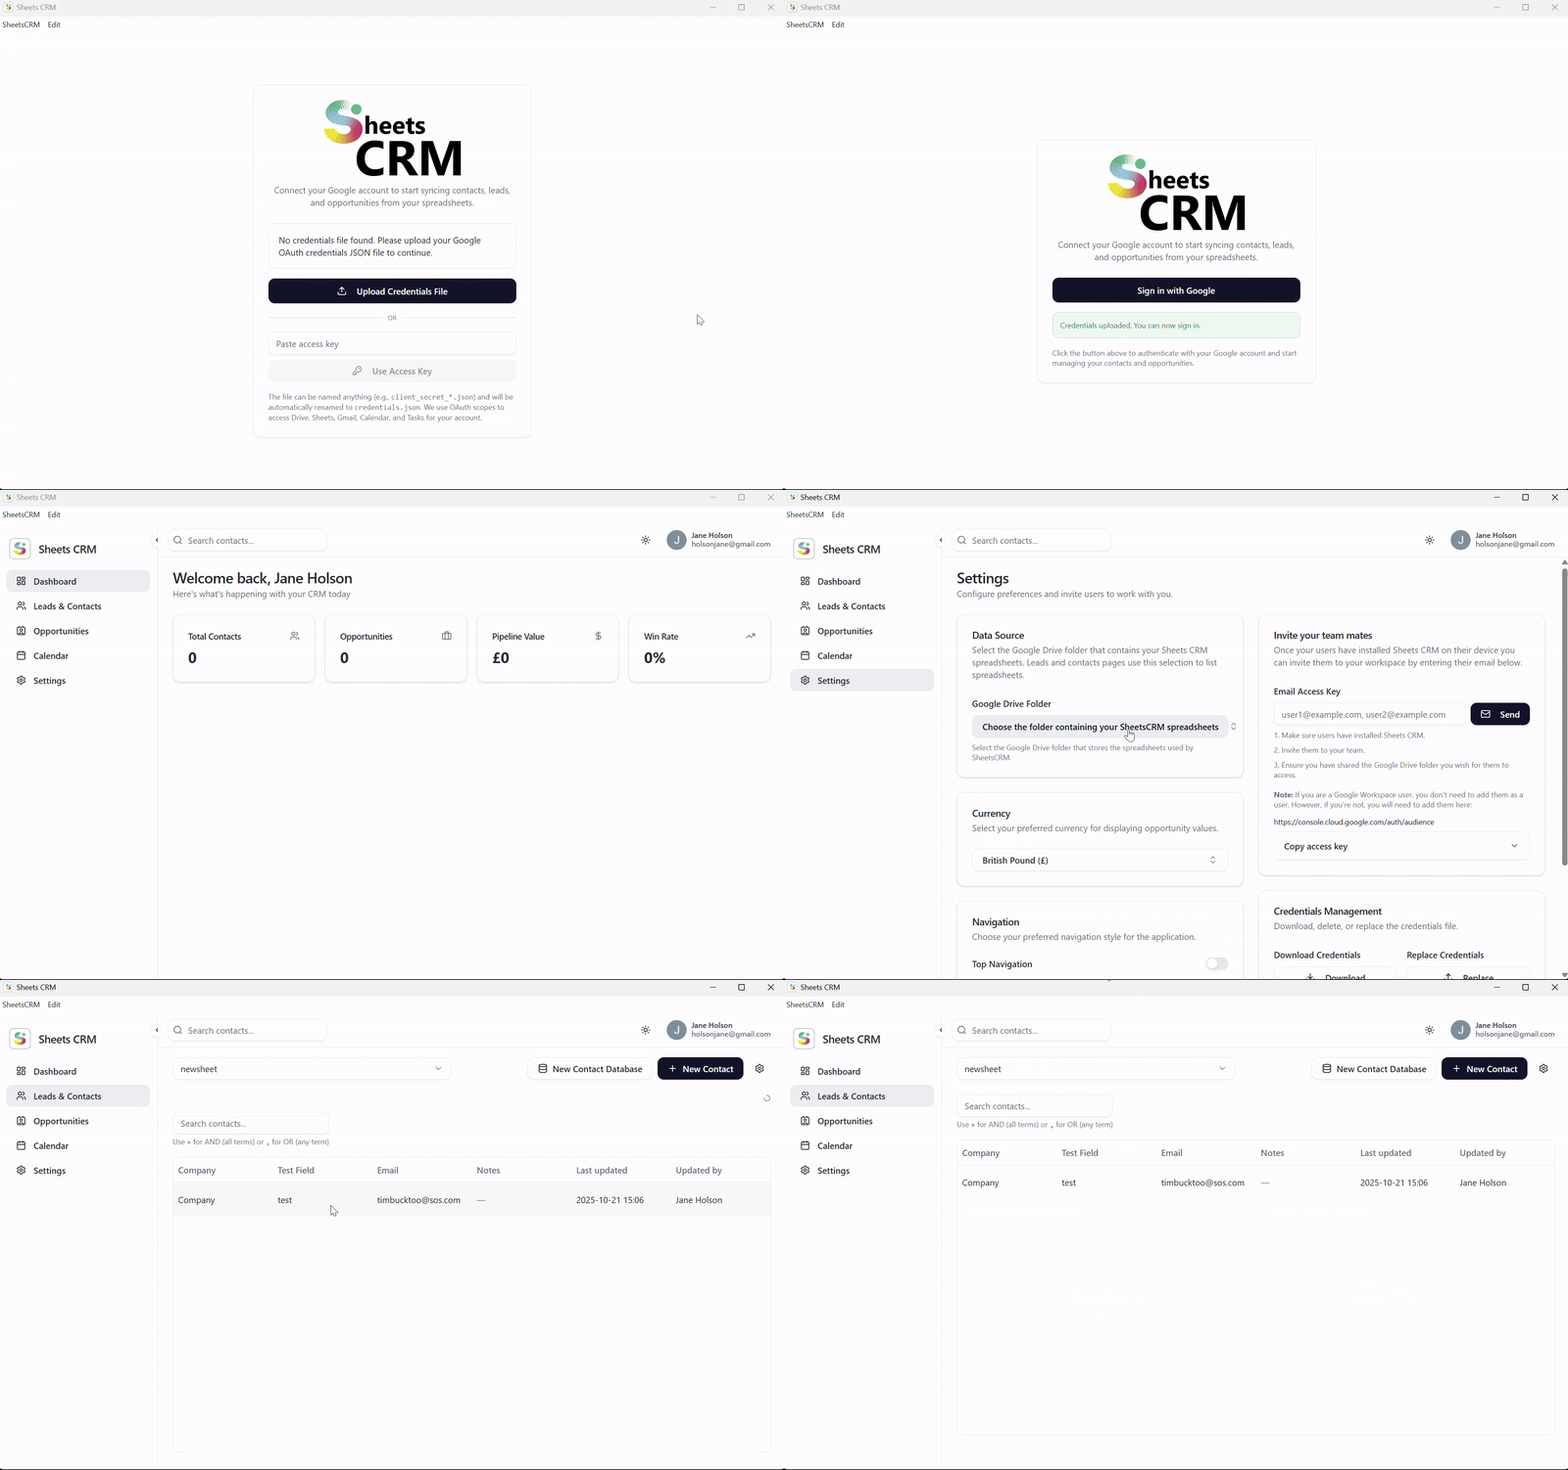
The account owner completes the Google setup wizard from the SheetsCRM home screen. This configures the Google services used by your shared workspace. Invited users do not repeat this setup.
- 1
Download the Windows or macOS installer using your licence number.
- 2
Install SheetsCRM and open the application.
- 3
On the home screen, the account owner opens the setup wizard and follows the instructions to create or select the required Google Cloud project, enable the required APIs and connect the application credentials.
- 4
Sign in with the Google account used during setup.
- 5
Choose the Google Drive folder that will hold your CRM data.
- 6
Create your first contact database. Invited users can instead sign in with the Google account that received their invitation.
The setup wizard only needs to be completed by the account owner. Team members install the app, accept their invitation and sign in.
02
Create and customise a database
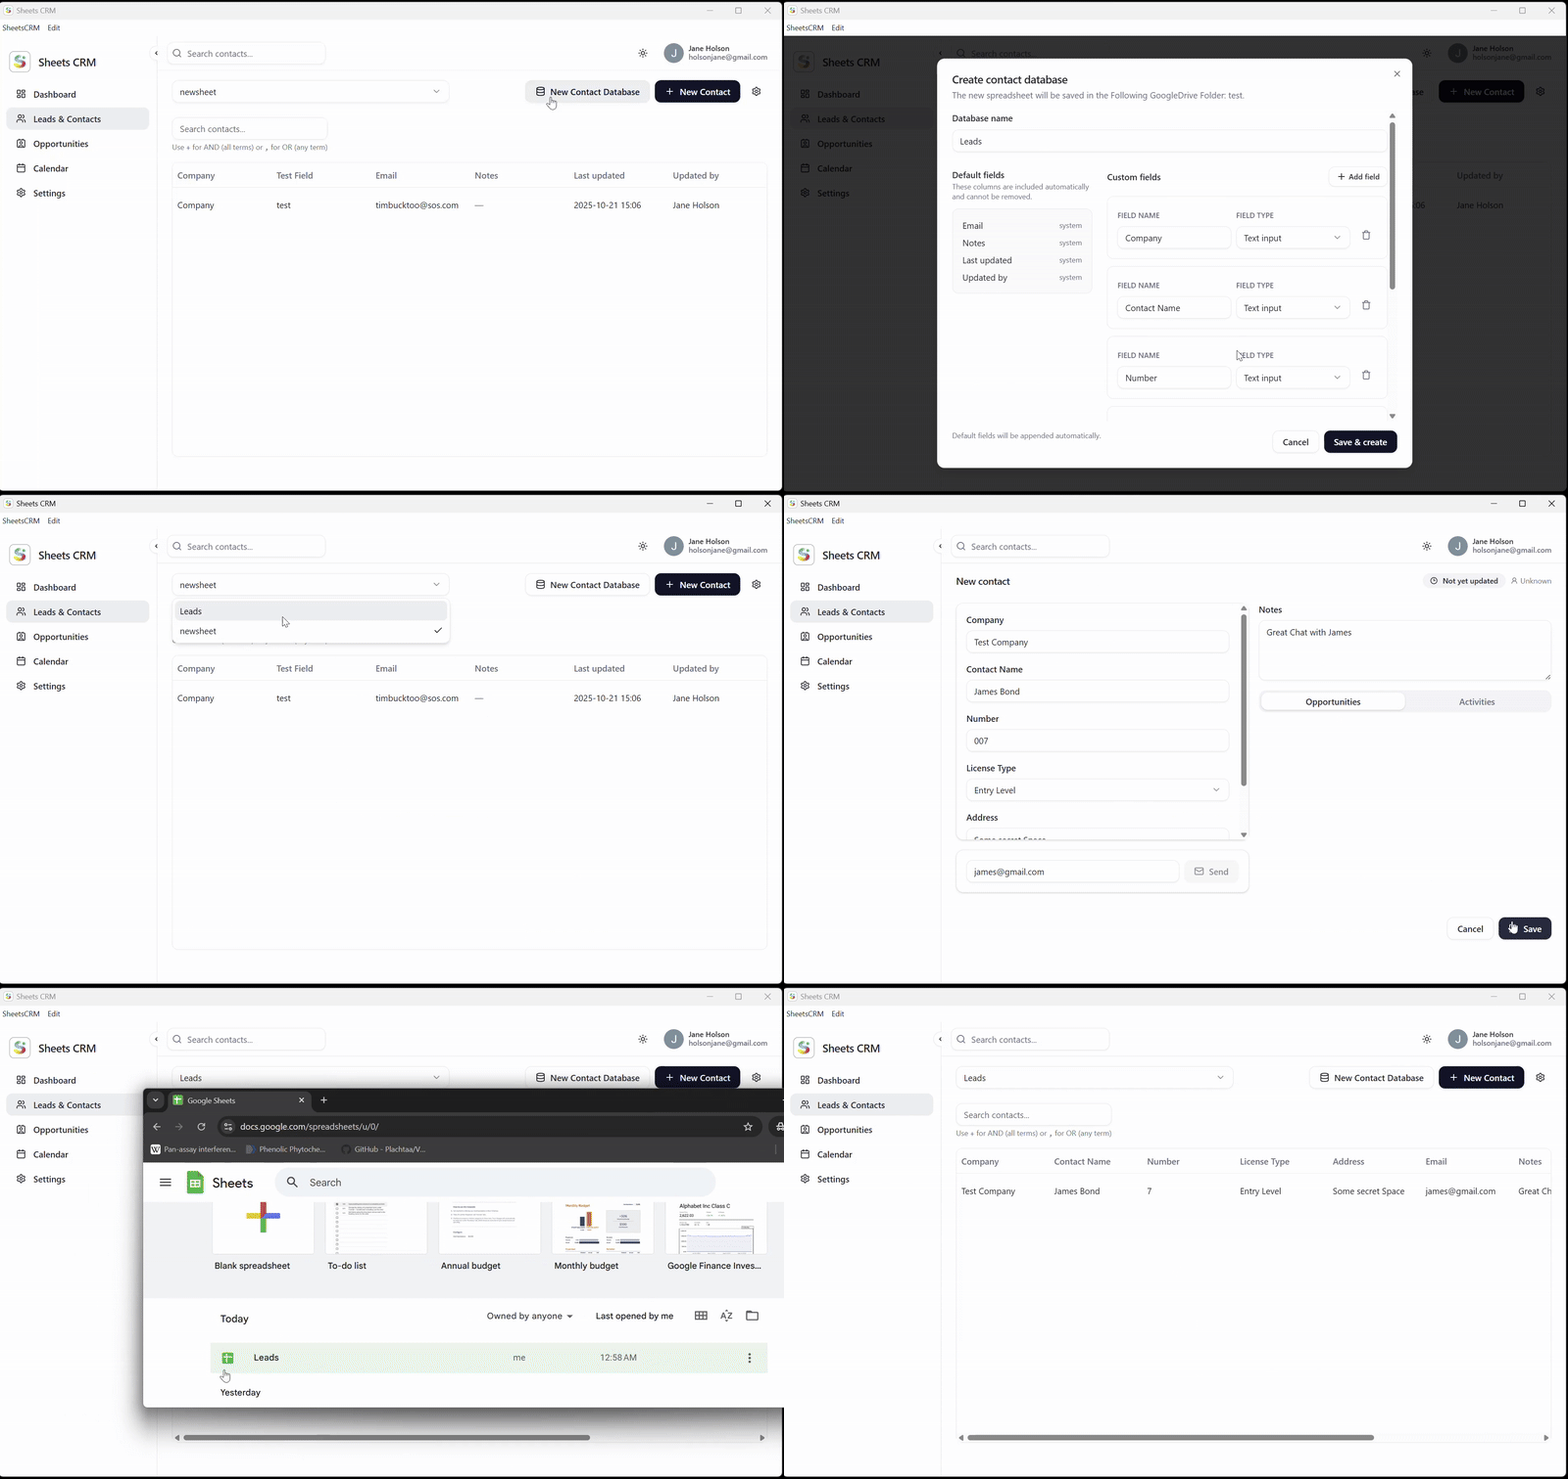
Create a database for leads, customers or any other relationship your team needs to manage. SheetsCRM stores the underlying records in the Google Drive folder selected during setup.
- 1
Open the contacts area and select Create new database.
- 2
Give the database a clear name that your team will recognise.
- 3
Add fields and choose the right data type for each value.
- 4
Drag fields into the order you want them to appear.
- 5
Make critical fields required to keep records complete and consistent.
SheetsCRM automatically maintains supporting fields and data needed by the application. You can return to database settings whenever your workflow changes.
03
Manage leads and contacts
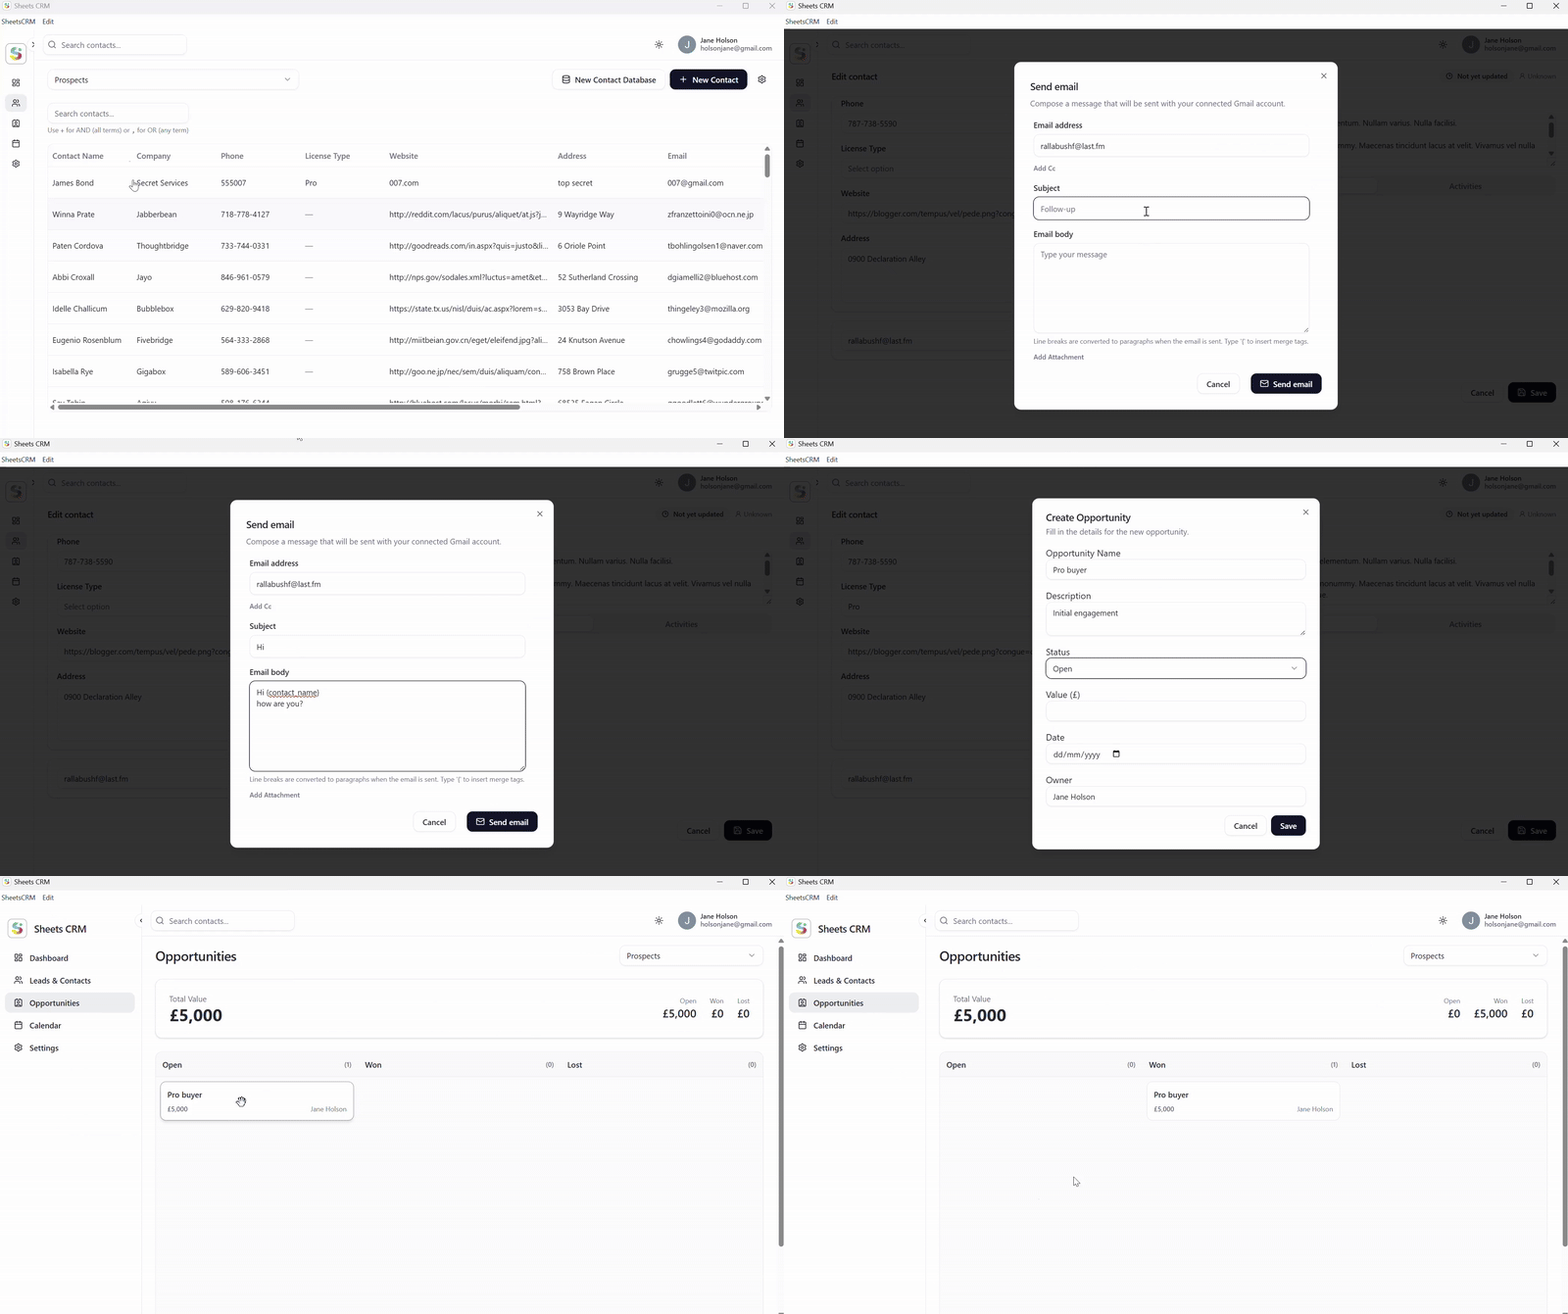
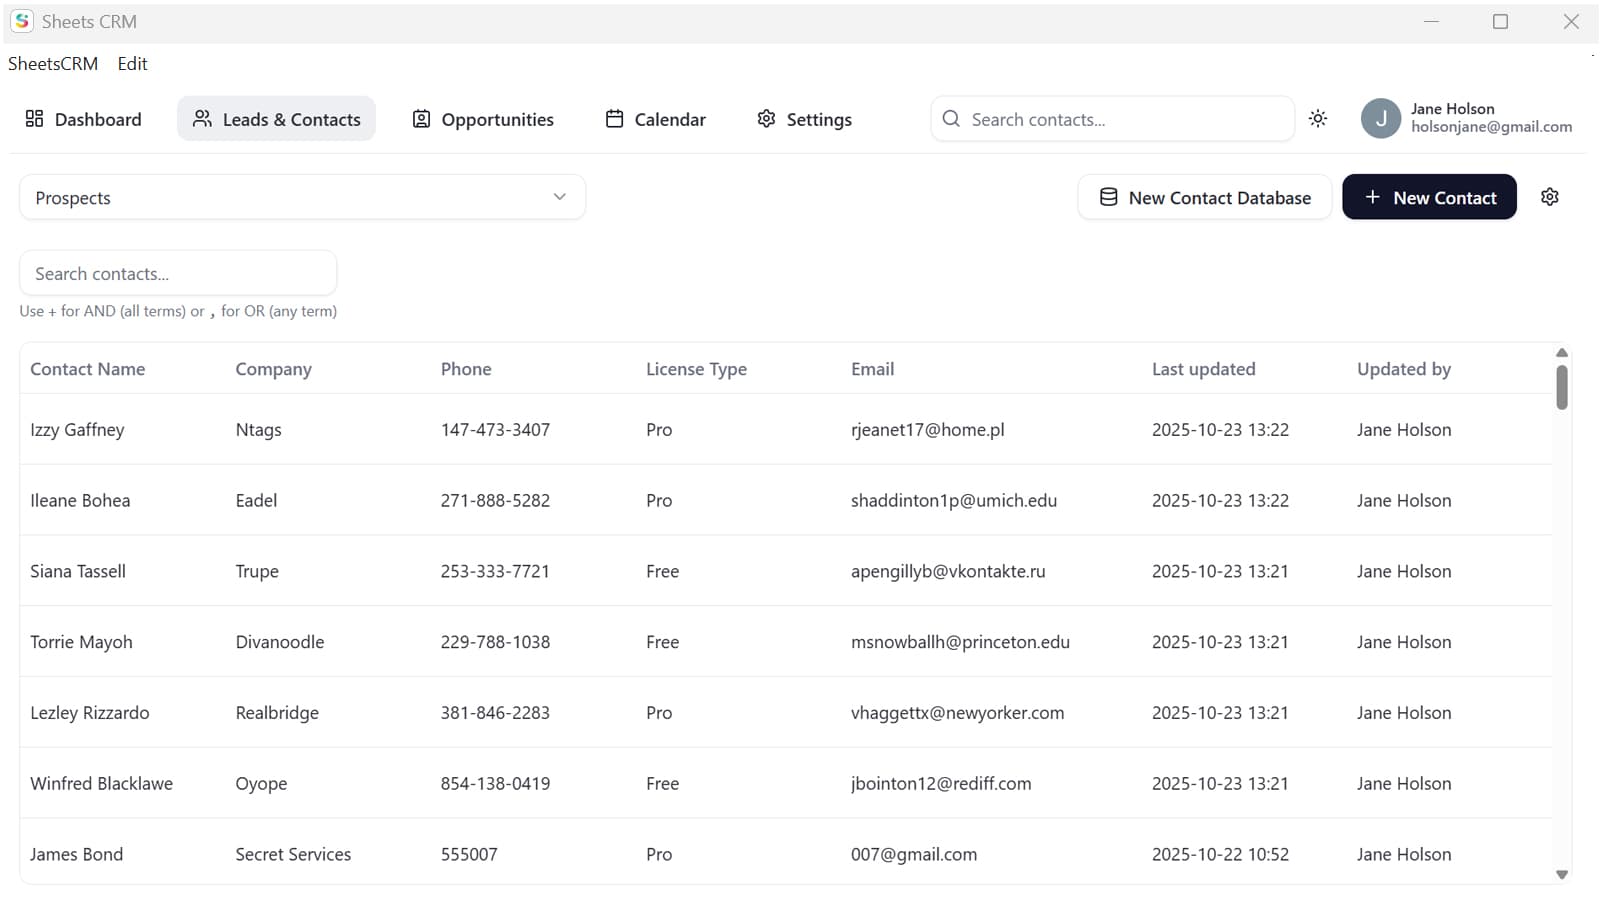
Open a shared database to search, filter and edit customer records. Each contact opens into a focused workspace for details, opportunities, notes and activity.
- 1
Select the database your team is using from the contacts screen.
- 2
Choose Create contact or select an existing table row.
- 3
Search and filter records using the fields in your database.
- 4
Update details and custom statuses from the contact window.
- 5
Send an email, create an opportunity, add a task or schedule a Google Calendar or Meet event without leaving the contact.
04
Opportunities
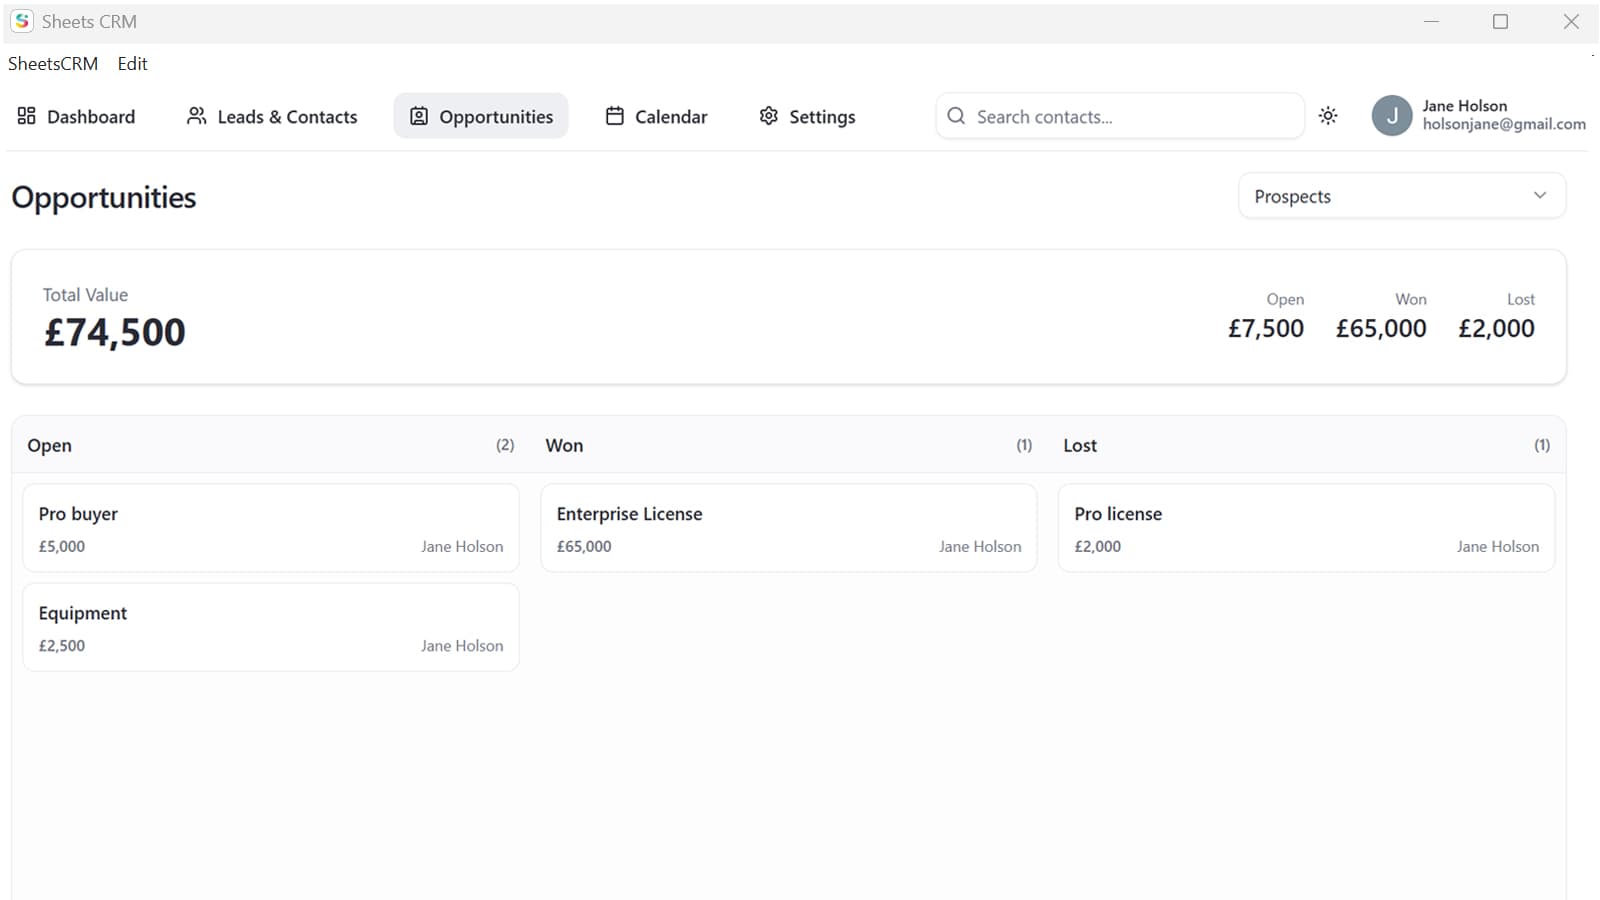
Give the whole team a visual view of the pipeline. Opportunities stay connected to their contact and can be moved through your custom stages as work progresses.
- 1
Open a contact and select Create opportunity.
- 2
Add the opportunity name, value, stage and supporting information.
- 3
Open Opportunities to view active deals across the shared pipeline.
- 4
Drag cards between stages as each opportunity progresses.
- 5
Open a card to update the opportunity or return to its contact record.
05
Tasks and calendar
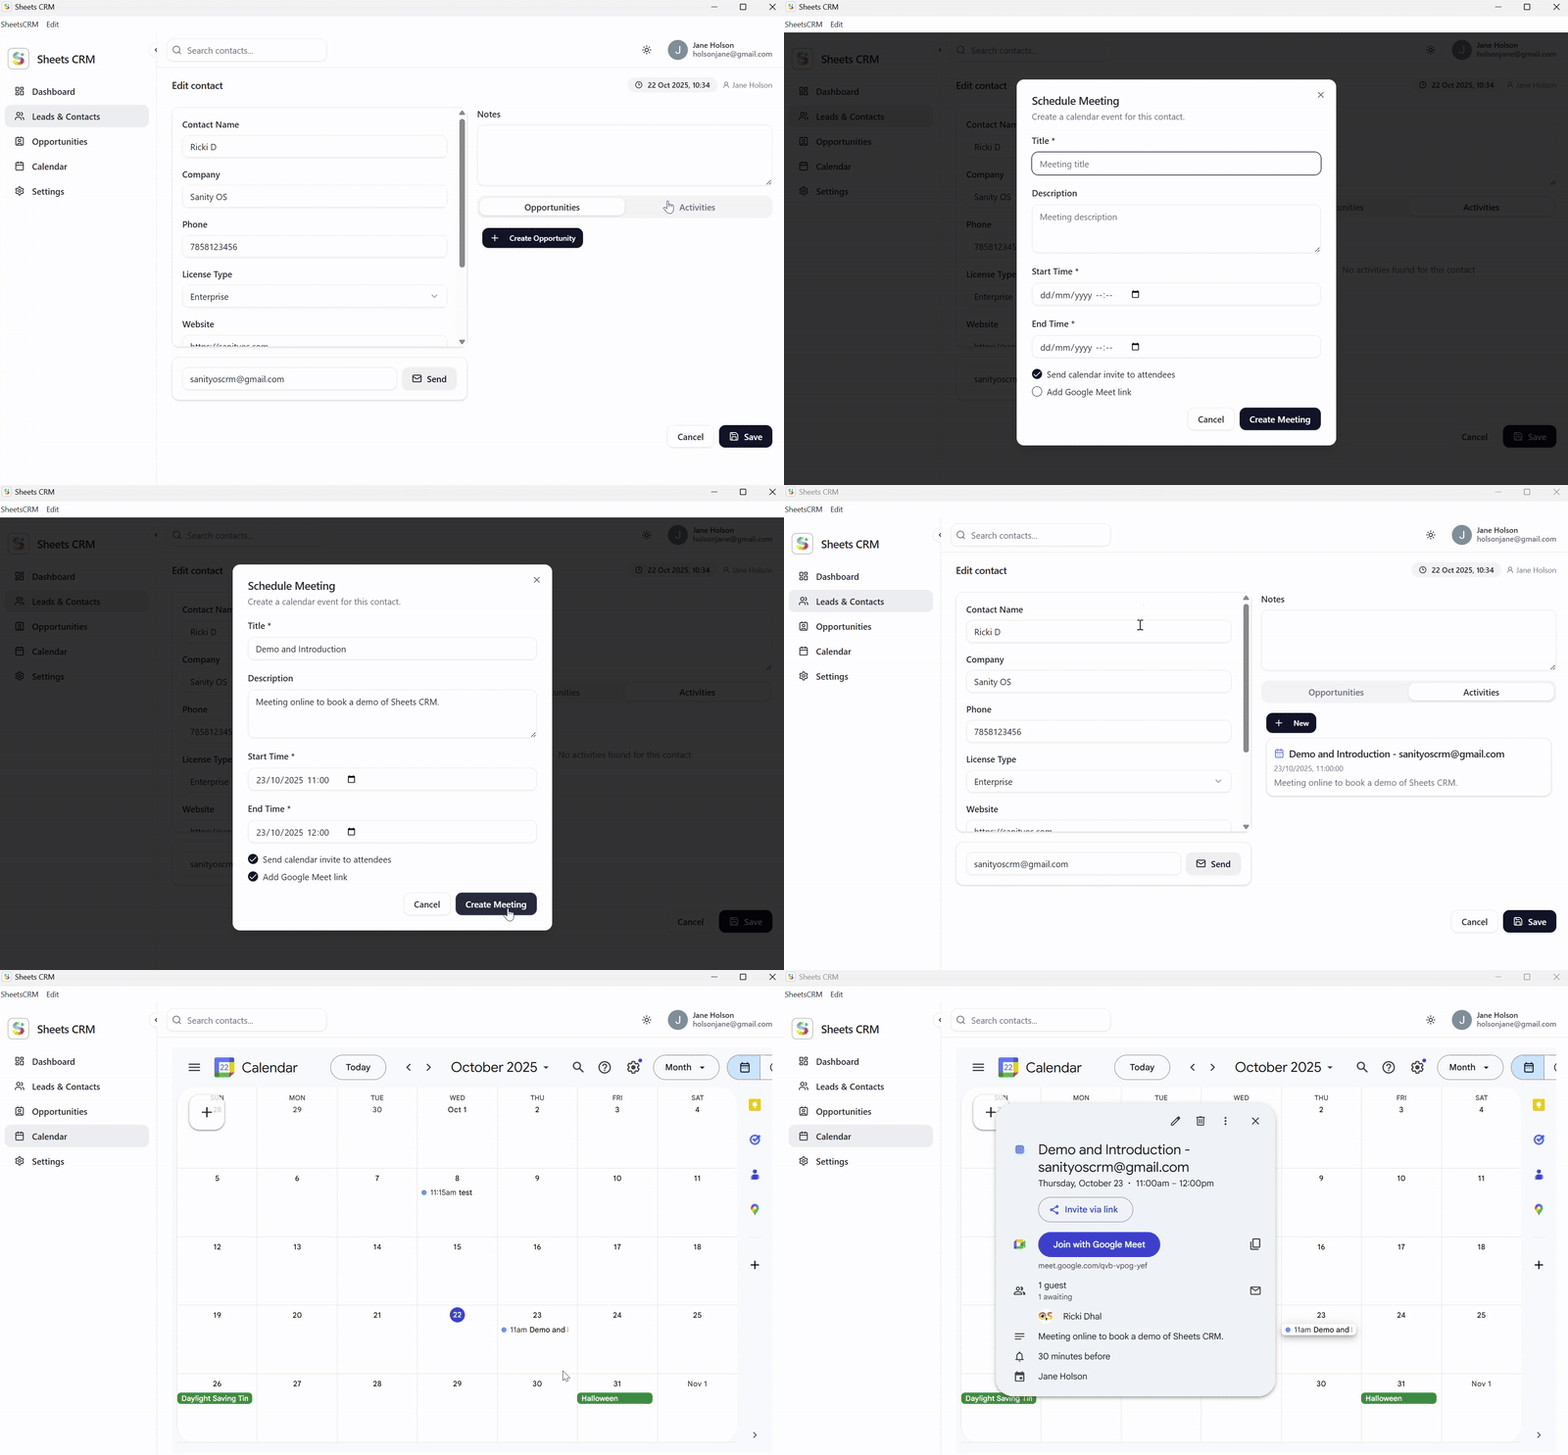
Book customer meetings and create follow-up work directly from a contact. Activities remain connected to the customer while syncing with the Google services your team already uses.
- 1
Open a contact and choose the Activities area.
- 2
Create an appointment, Google Meet call or Google Task.
- 3
Add the date, time, attendees and any useful context.
- 4
Save the activity to add it to the contact timeline.
- 5
Use the Calendar and Tasks screens to review upcoming work.
06
Invite team users
Once the account owner has completed the one-time setup, colleagues can join the same Google-backed workspace without repeating it.
- 1
Open Settings and select the team users area.
- 2
Enter the Google email addresses of the people you want to invite.
- 3
Review and change their permissions as required.
- 4
Send the invitations.
- 5
Each colleague installs SheetsCRM and signs in with the invited Google account.
Google Drive and Google Sheets permissions remain the underlying source of access to shared CRM data.
Your data remains under your control.
SheetsCRM uses your own Google account and Google Workspace services instead of moving customer data into a separate hosted CRM database.
Users access the workspace through their approved Google account.
Manage app permissions alongside Google's file-sharing controls.
Frequently asked questions.
Installation, licensing, compatibility and data ownership answers in one place.
My macOS device will not let me install SheetsCRM. What should I do?
macOS may block applications downloaded outside the App Store until you approve them. Try opening SheetsCRM once, then open System Settings → Privacy & Security. Scroll to the security message for SheetsCRM and choose Open Anyway. Confirm the prompt using your administrator password if requested.
Apple changes these screens between macOS versions. The video below demonstrates the installation process.
What are the requirements to use SheetsCRM?
The account owner needs Windows 10 or later, or macOS 10.13 or later, a Google account and access to Google Cloud Console to complete the setup wizard.
Invited team members need SheetsCRM installed and the Google account used for their invitation.
Are macOS and Windows versions sold separately?
Your SheetsCRM licence currently includes both the Windows and macOS installers.
Do I need a Google Workspace account?
No. A standard Google account can be used. Google Workspace can make organisation-wide user and permission management easier, particularly for larger teams.
Is my data safe with SheetsCRM?
Your CRM records remain in Google Sheets and Google Drive under your Google account. SheetsCRM does not move that customer data into a separate hosted CRM database. Access is controlled through Google authentication and sharing permissions.
Are there recurring costs?
SheetsCRM is sold as a one-time licence with no Sanity OS subscription, hosting charge or per-user fee. Your use of Google services remains subject to Google's own terms and usage limits.
Can I use SheetsCRM offline?
An internet connection is required for authentication and for syncing with Google Sheets, Gmail, Calendar, Drive, Meet and Tasks. SheetsCRM is designed primarily for connected use.
How many team members can I invite?
SheetsCRM does not charge per user. You can invite the team members required by your workflow, subject to the sharing, account and API limits applied by Google.
What happens if I need to migrate my data?
Your customer data is stored in Google Sheets, so you can access and export it independently of SheetsCRM. Google Sheets supports common formats including Excel and CSV, reducing vendor lock-in.
Does SheetsCRM work on mobile devices?
The complete SheetsCRM interface is available as a desktop application for Windows and macOS. You can still access the underlying Google Sheets from mobile devices where appropriate.
Why is SheetsCRM a desktop application rather than a browser CRM?
The desktop model provides a focused CRM experience without requiring Sanity OS to host your customer database. It combines a native application with Google Workspace services and a one-time licence.
Can I connect my website contact form?
Yes. Because contacts are stored in Google Sheets, forms and automation platforms that support Google Sheets can add records to the relevant spreadsheet. Make sure any integration preserves the columns and data structure expected by your SheetsCRM database.
What operating systems are supported?
SheetsCRM currently supports Windows and macOS.
Is the Google Sheets API free?
Google provides API quotas for its services rather than charging a SheetsCRM usage fee. SheetsCRM uses caching and synchronisation to limit unnecessary requests. Your available quota remains governed by Google and may vary by account or project.
Are updates included?
Lifetime product updates are included with the current SheetsCRM licence.
Can I use an existing spreadsheet?
Yes. Place the spreadsheet in the Google Drive folder selected for SheetsCRM and name the sheet containing your contact data contacts. SheetsCRM may add supporting sheets for opportunities and application settings. Back up an important spreadsheet before connecting it for the first time.

Need help?
Get product support Tell us where you are stuck.
Choose Product support on the contact form and include the screen or action causing the problem.